
My knowledge on social media and marketing from a business perspective has changed since the beginning of the semester. I started out knowing only a few platforms, and now I know a multitude of them, plus how to run them. I am a lot more comfortable shooting a you tube video now than when we first started this semester, and personally since i started school in general. I enjoyed weekly blogging on WordPress, and will continue to do so. There are loads of blogs to be wrote about creating through meditation.
Yoga

On a little less creative and more meditative state, lets talk Yoga. Anyone can do some type of yoga, and it can take as much time as you desire. Do a quick 5 minutes or do a half an hour. Even a simple stretch-it-out feels nice, especially right when waking up. As a mom, I do not have much time to spend working out. So I look to yoga when I cannot go to the gym, or its raining outside, or my living room floor is filled with toys (this is my favorite because I can pick up toys while doing my yoga). Some benefits of yoga are; increased flexibility, increased muscle strength and tone, cardio and circulatory health, and can help with weight reduction. The more you work the yoga poses, the more benefits you will get from it. Yoga has been found to improve quality of life, reduce stress, anxiety, insomnia, depression and back pain. I have recently purchased what is called a yoga trapeze, and this delightful thing is simply amazing. Once you have the ceiling hooks in place, you can clip it to each one and go. You can also use it outside on a tree, or purchase a stand for it, if you don’t want to hang from your ceiling! It almost works like an inversion table, you can hang upside down and stretch out your entire back, you can stretch just about anything on this swing. My kids love it too, my 2 year old pretty much thinks when its up, its his sleeping hammock, and my 7 year old thinks its an actual indoor swing, but hey its holding up pretty dang good if you ask me. However you decide to enjoy yoga, just remember to do deep clearing breathes and exhale the stress. In the feature image, I have posted a position chart for beginners, that would like to get started.
Cooking
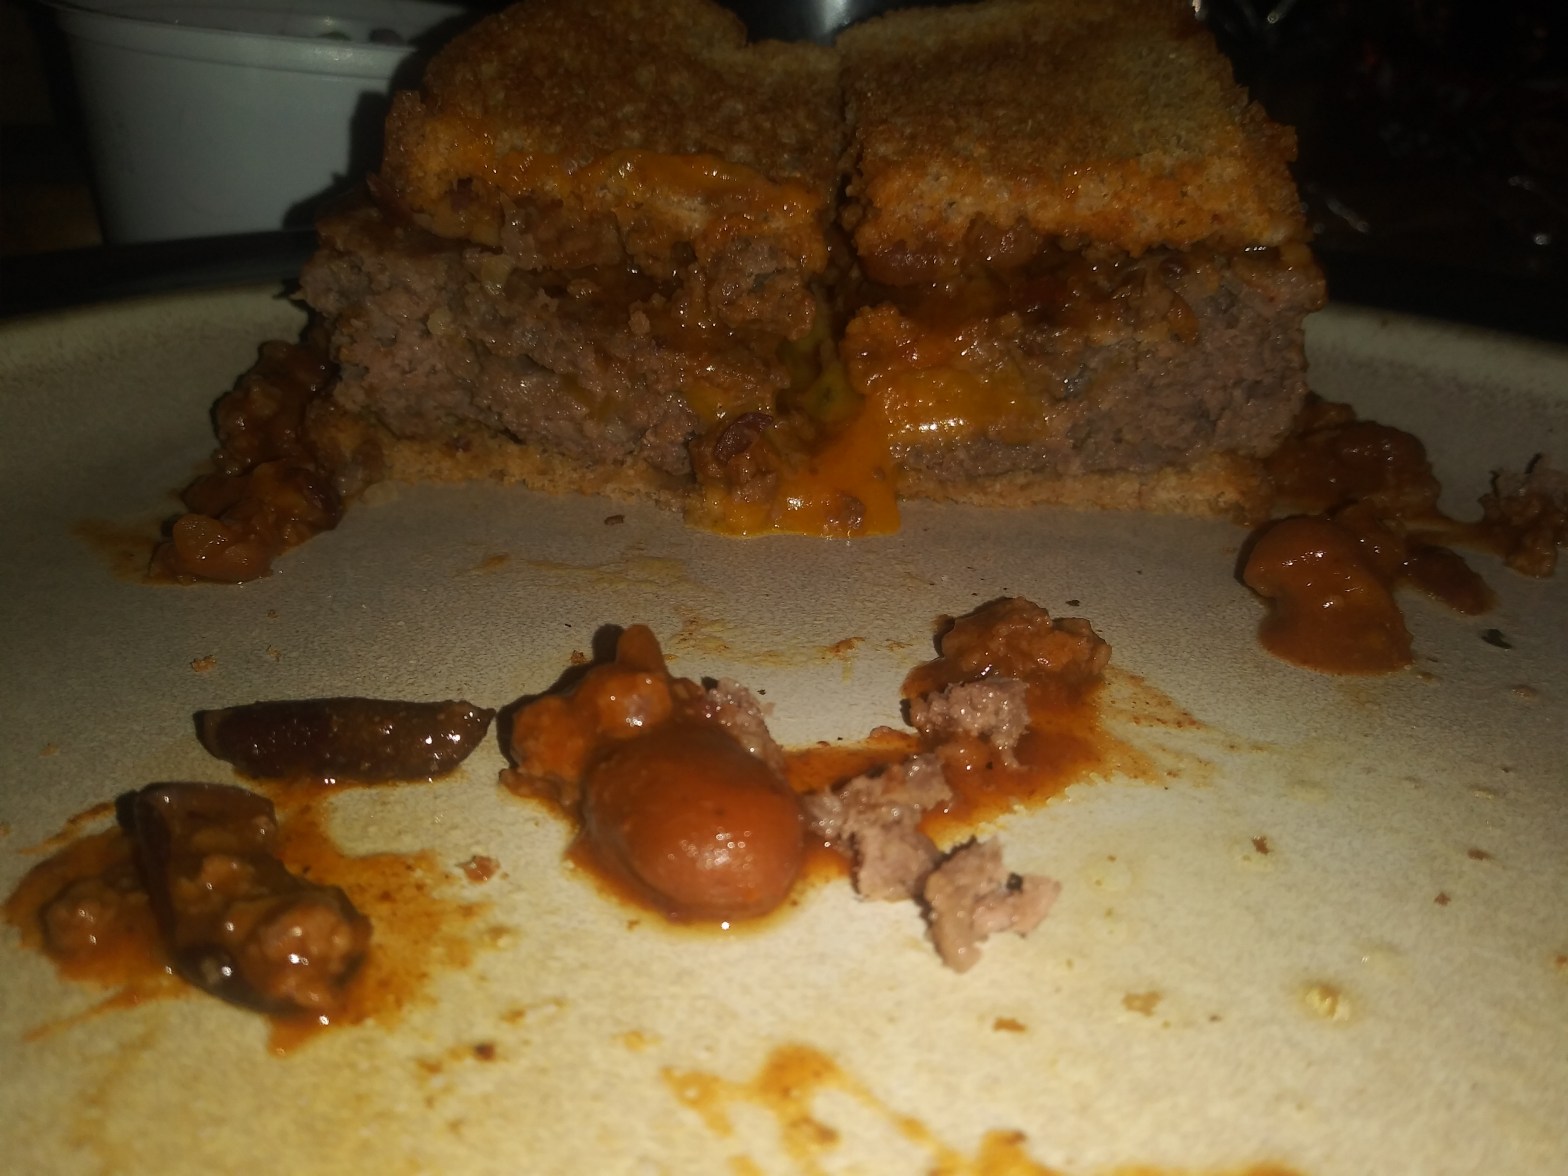
Another way I have found to relax is cooking. I usually just zone in and go to town, keeps my mind off other things for however long it takes. Coming up with new things to eat or try to eat is always exciting. So far I have only managed to make a handful of things that are nasty. The featured image of a homemade burger, on toast with cheese and chili. Simple, yet tasty. I love making ordinary food and I love it even more when I make something new, without receipe, and it ends up being a total hit with my family. Sometimes my boys have their doubts because of how something looks but I tell them take 3 bites and if you honestly don’t like it, then I will never make it for you again. In the end they all end up loving it, asking me when I will make it again, and telling me im the best cook ever. Though they also tell their dad that when he’s in charge of cooking for the night. So I wont get too big of an ego head going on over here. I absolutely love food, and to be able to relax, create and eat. Well thats just a win all over the place for me. So get in the kitchen, try and make something crazy, from a receipe, from a box, whatever you choose, just don’t dump the salt in it! You cannot take that back out nor cover it up!
Laters
Vlogging
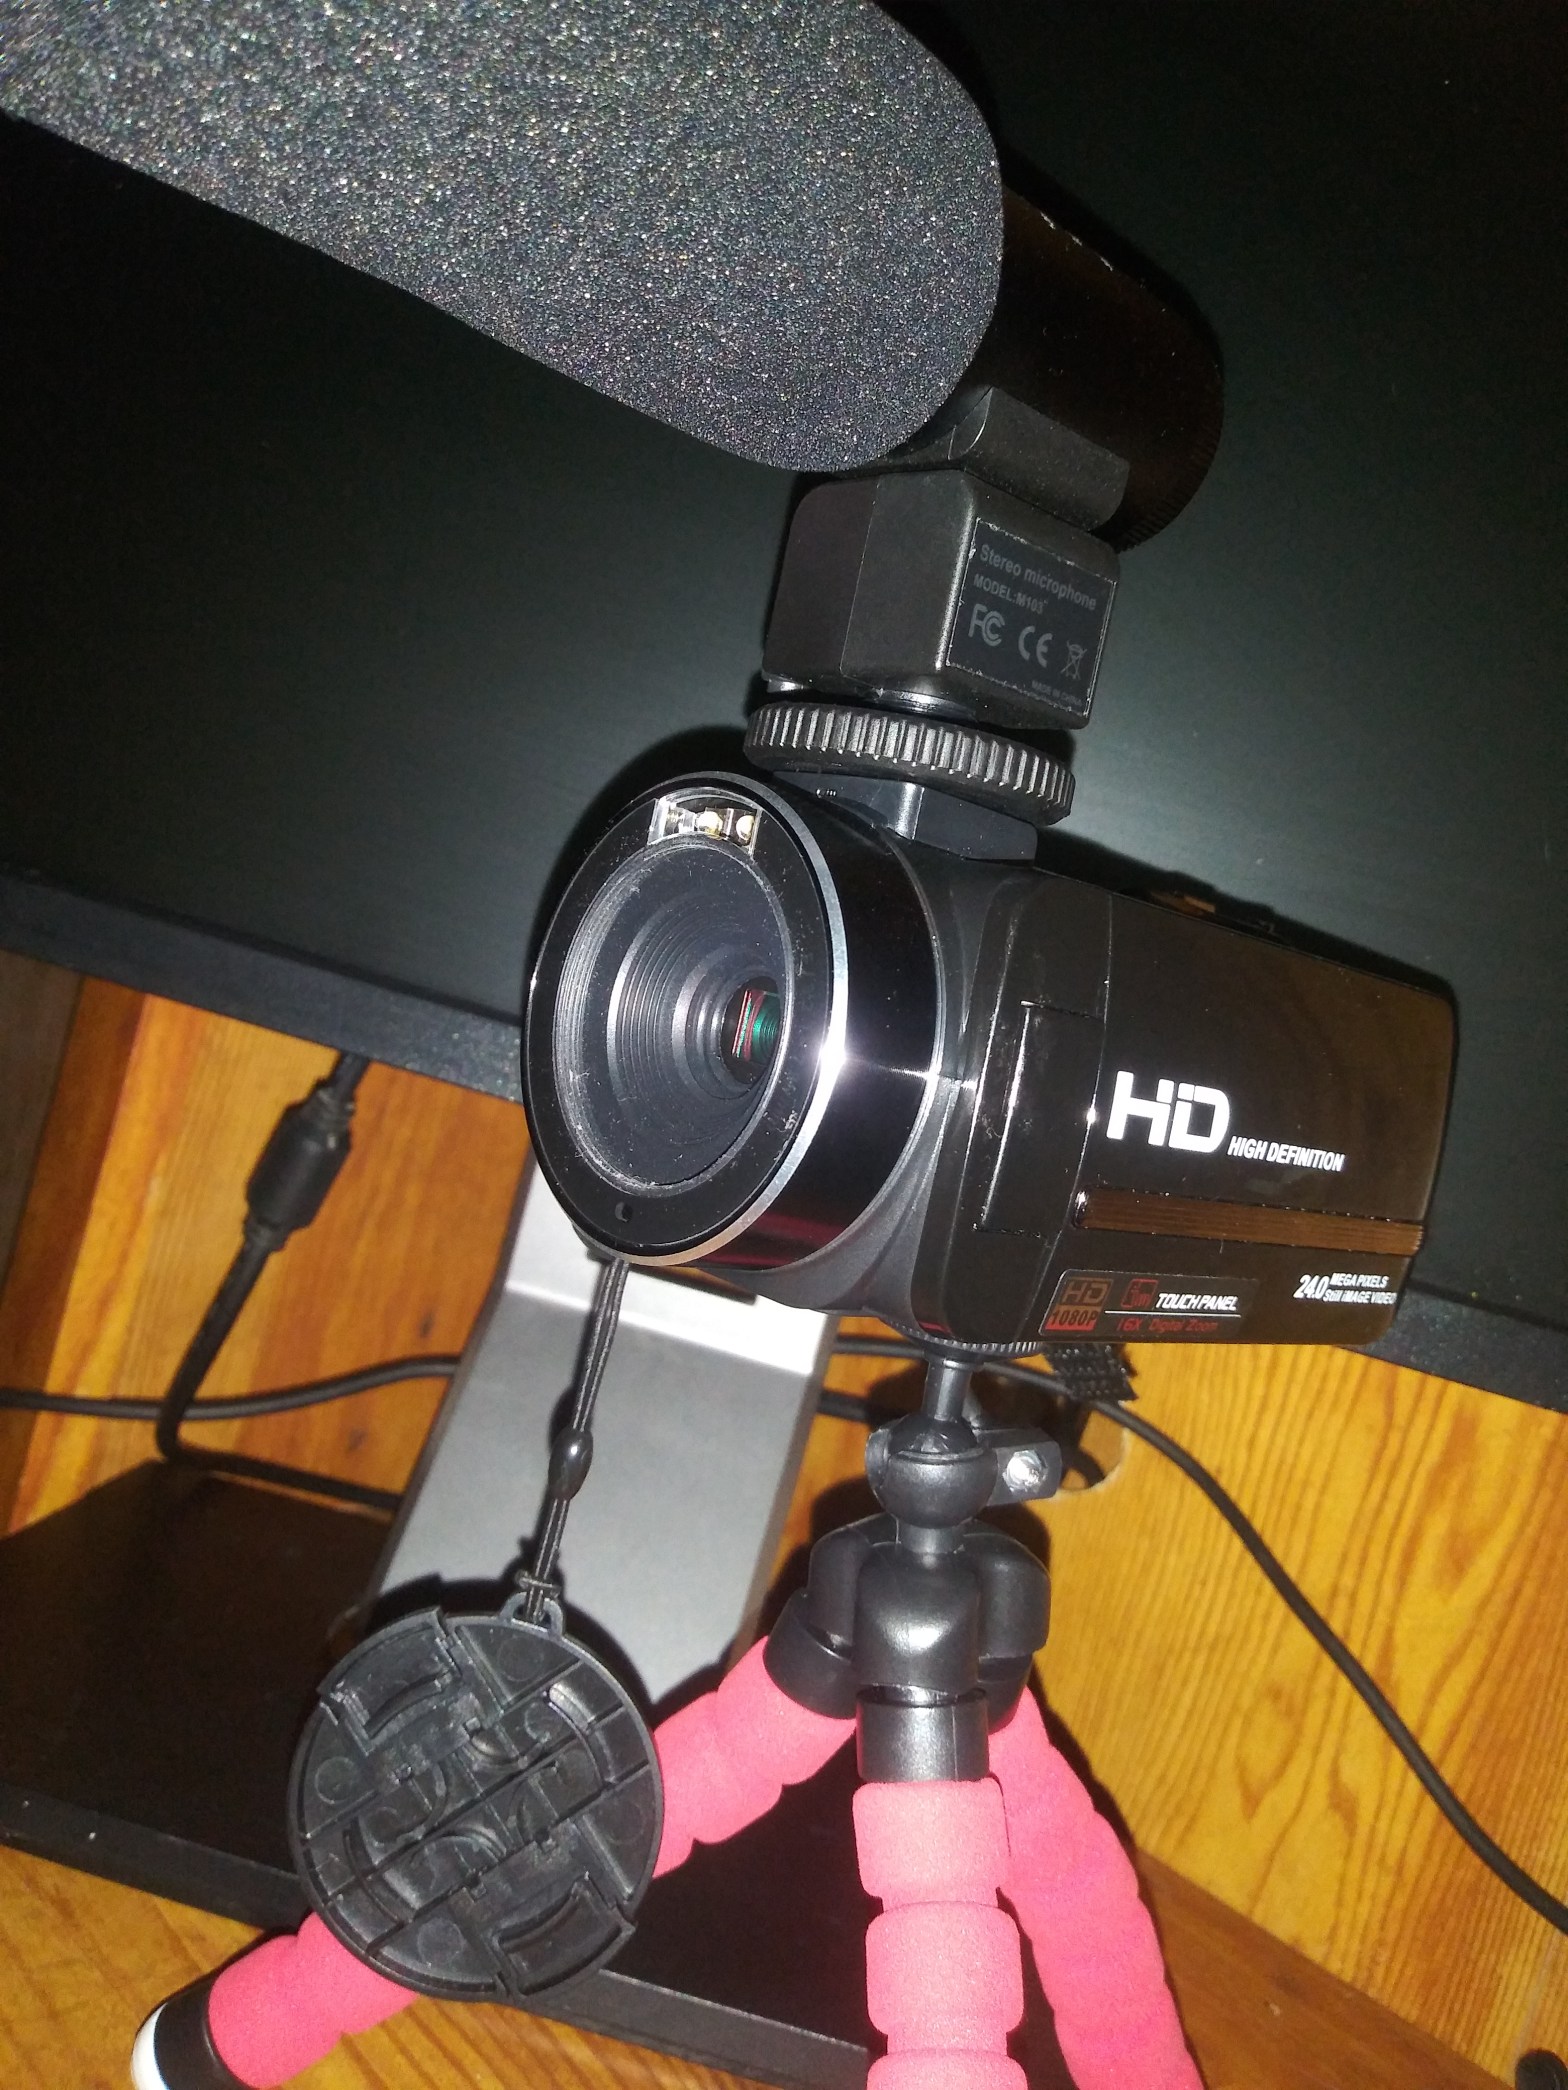
This way of creation may not be what most consider Art but it is still a way of creating and it can very well put you into a meditation. I think this is a neat form of creation because you can use it to create a business, you can use it to create memories, you can use to to do all kinds of things. The one thing you are guaranteed at the end, is something you’ll always have to watch as many times as you want. Make a movie, film your family, do a skit, make a comedy show out of your own home, what ever you are doing will inevitably end up a memory and something you can look back and smile on. Whether you make it big in the YouTube world or just keep it to yourself. Have fun and Enjoy learning as you go. I have just recently purchased this fancy dancy video recorder, it doubles as a neat camera with different lens’. I am excited to try this new little device out and see what magic I can make with it. It may not be much, but it is perfect for new beginnings.
Baking
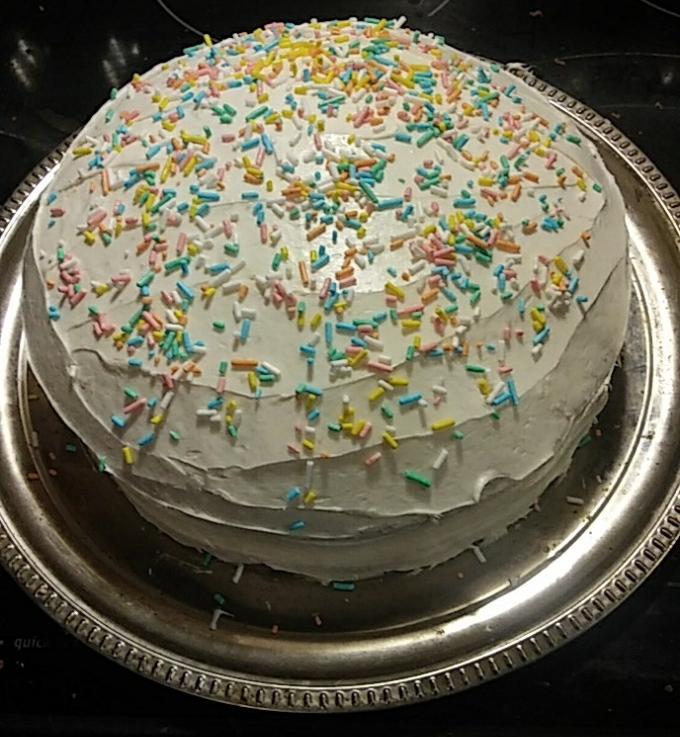
One of my favorite ways to create and meditate ends up in the form of food. Baking for me can be very therapeutic. It can also end in disaster and that is okay too. Practice more and things come to you a little easier every time. In the picture is my very first double layer cake I had made for my sons 2nd birthday. It may be simple but I am proud of my work. Especially considering I tried to replicate this the following weekend and it ended up broken, but still eaten of course. My favorite is baking things to decorate, I am definitely a beginner but i enjoy seeing the final product when its done. I can’t wait to learn more, my next project I would like to tie-dye the inside of a cake and frost it.
[youtube=https://www.youtube.com/watch?v=XEnHlS_hjEI&w=560&h=315]
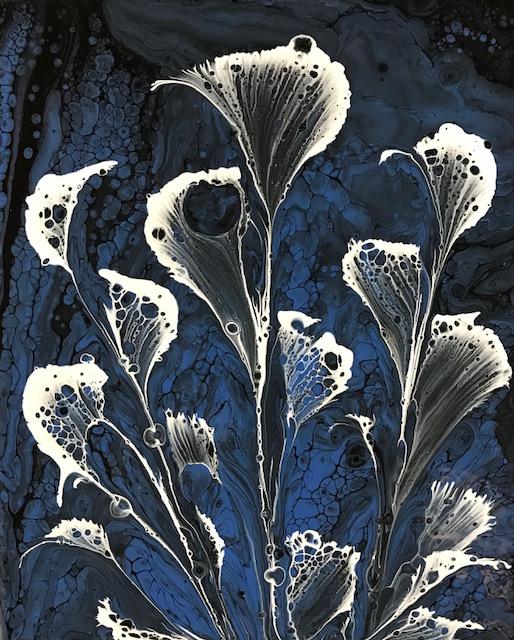
Epoxy Resin Art
This is one of my favorite methods of creative meditation. It is similar to paint pouring but when the epoxy hardens, it is more like a glass look. As this video shows a beach art piece, you can see how everything moves so fluidly on the board. What is great about this concept of art, is you don’t have to just put it on a flat piece. You can make jewlery this way, do countertops and flooring, you can even make paper weights if you really wanted to. The combinations of colors you can use are endless and you will always have a beautiful glossy finish when you are done. These make beautiful pieces of art and are so calming to make too!
Coloring Books
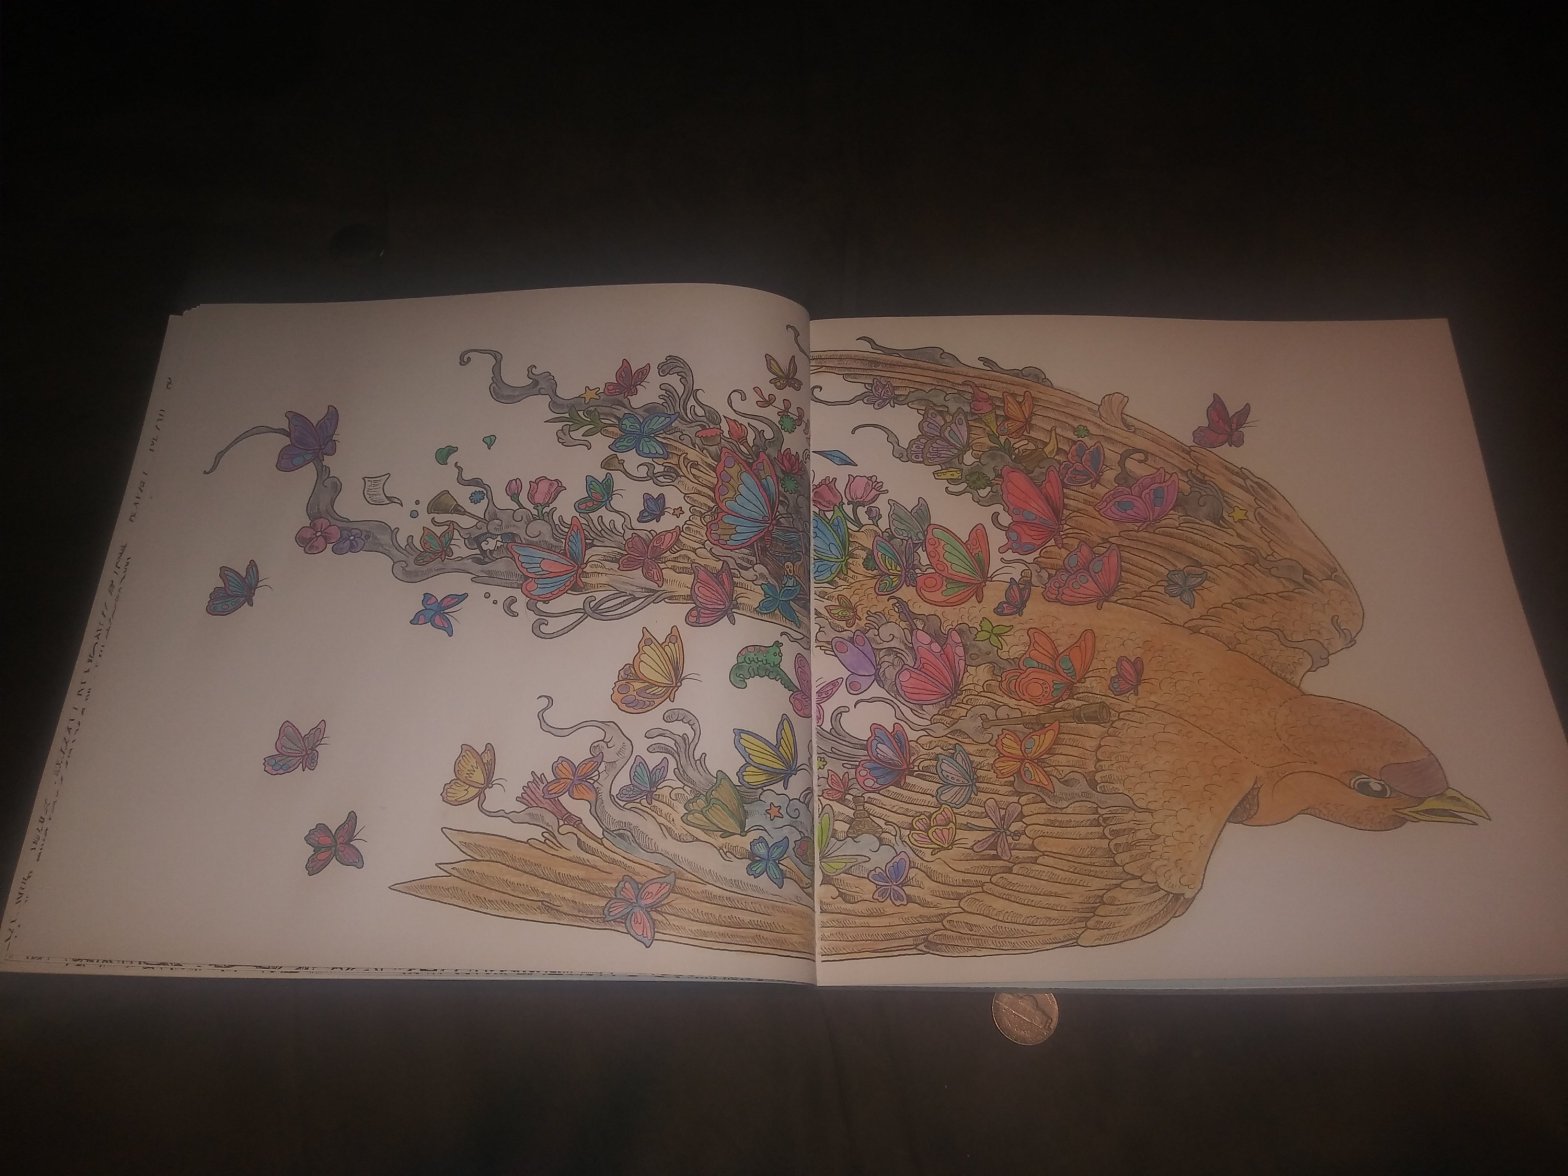
Another relaxing venture to try is to simply color. They have designed coloring books for adults and there are always loads to choose from. The one I did in the featured picture was from a coloring book called Imagimorphia. It took me about 3 hours all together but I have to do it in pieces of about 15 minutes each. This is a great method for meditation because you can start and stop whenever you need to. This one is great for parents especially to do with their kids. I usually give my kids their own coloring book but we all have fun in the end. It gives them time to slow down a little! All in all I would have to say this is a peaceful way to relax.
Glass Blowing
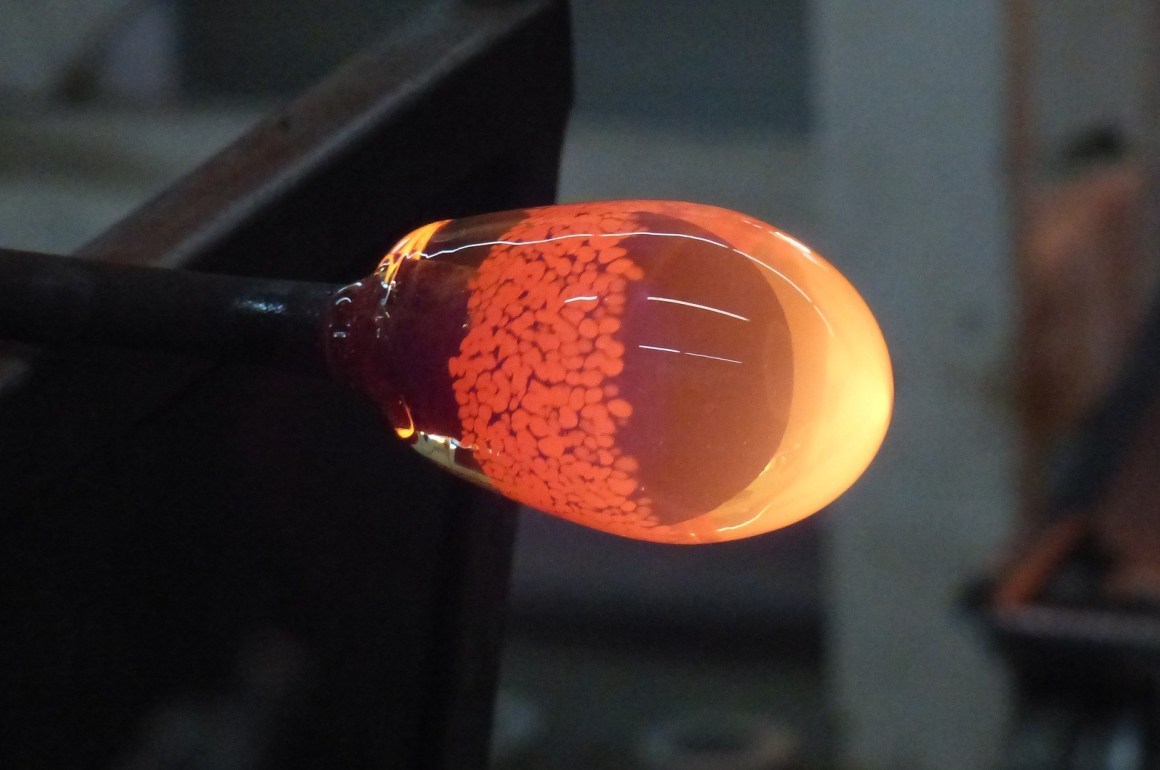
Another form of what I would consider Art Therapy is Glass Blowing. This is one I have not personally experienced as of yet. However, I have watched Blown Away on Netflix which peaked my interested enough to start watching random people on YouTube doing this activity. All of it got me to thinking about the patience and stability one would need behind these kinds of pieces. This is something I dearly want to try, even if I do feel like I would break the first 30 pieces in an attempt of something so small. If you can train your mind to be calm, rolling the metal pipe back and forth, carefully blowing life into a fragile piece of glass at high temperature, I feel would be the greatest release of them all. To have something to focus on with no distractions, clear and precise movements, and all with grace. I fully admire those who have this technique down to a science, and hope I may aspire to be similar to them someday. I’ve always dreamed of doing something artistic and this would be the biggest dream of all. To be able to have a shop where I can make any custom-made glass product with skill and precision. I think it would be really fun to master this technique. Maybe some day…
String Paint
Doing a String style painting can be done a few different ways.
You need:
String
Paint
Glue
Water
Canvas
First you need to paint your canvas with your choice of background color. The purpose of painting the background first is so the paint stays where you want it to stay, and moves when you want it to move.
Then dip your string in your choice of color paint. When doing this, I do it the same way that I do a paint pour. I mix 2 parts acrylic paint, 1 part glue, and a little bit of water for liquid effect. Once your string has been put in the paint, you can then lay out your string in a wavy manner across the canvas. You may use more than one string, more than one color, and go any direction you want.
After your string covered in paint has been laid out just so, you take the end closest to you and you pull it off the canvas, slowly. You can move the string to make your painting do whatever you want it to.
Once all strings have been pulled, let your master piece air dry and walla you have just accomplished your first string paint technique.
You can also enclose the strings and make a double-sided picture, or place a piece of paper on the top of the canvas and pull down allowing the paper to spread out the paint further.
Happy Painting!
Paint Pouring
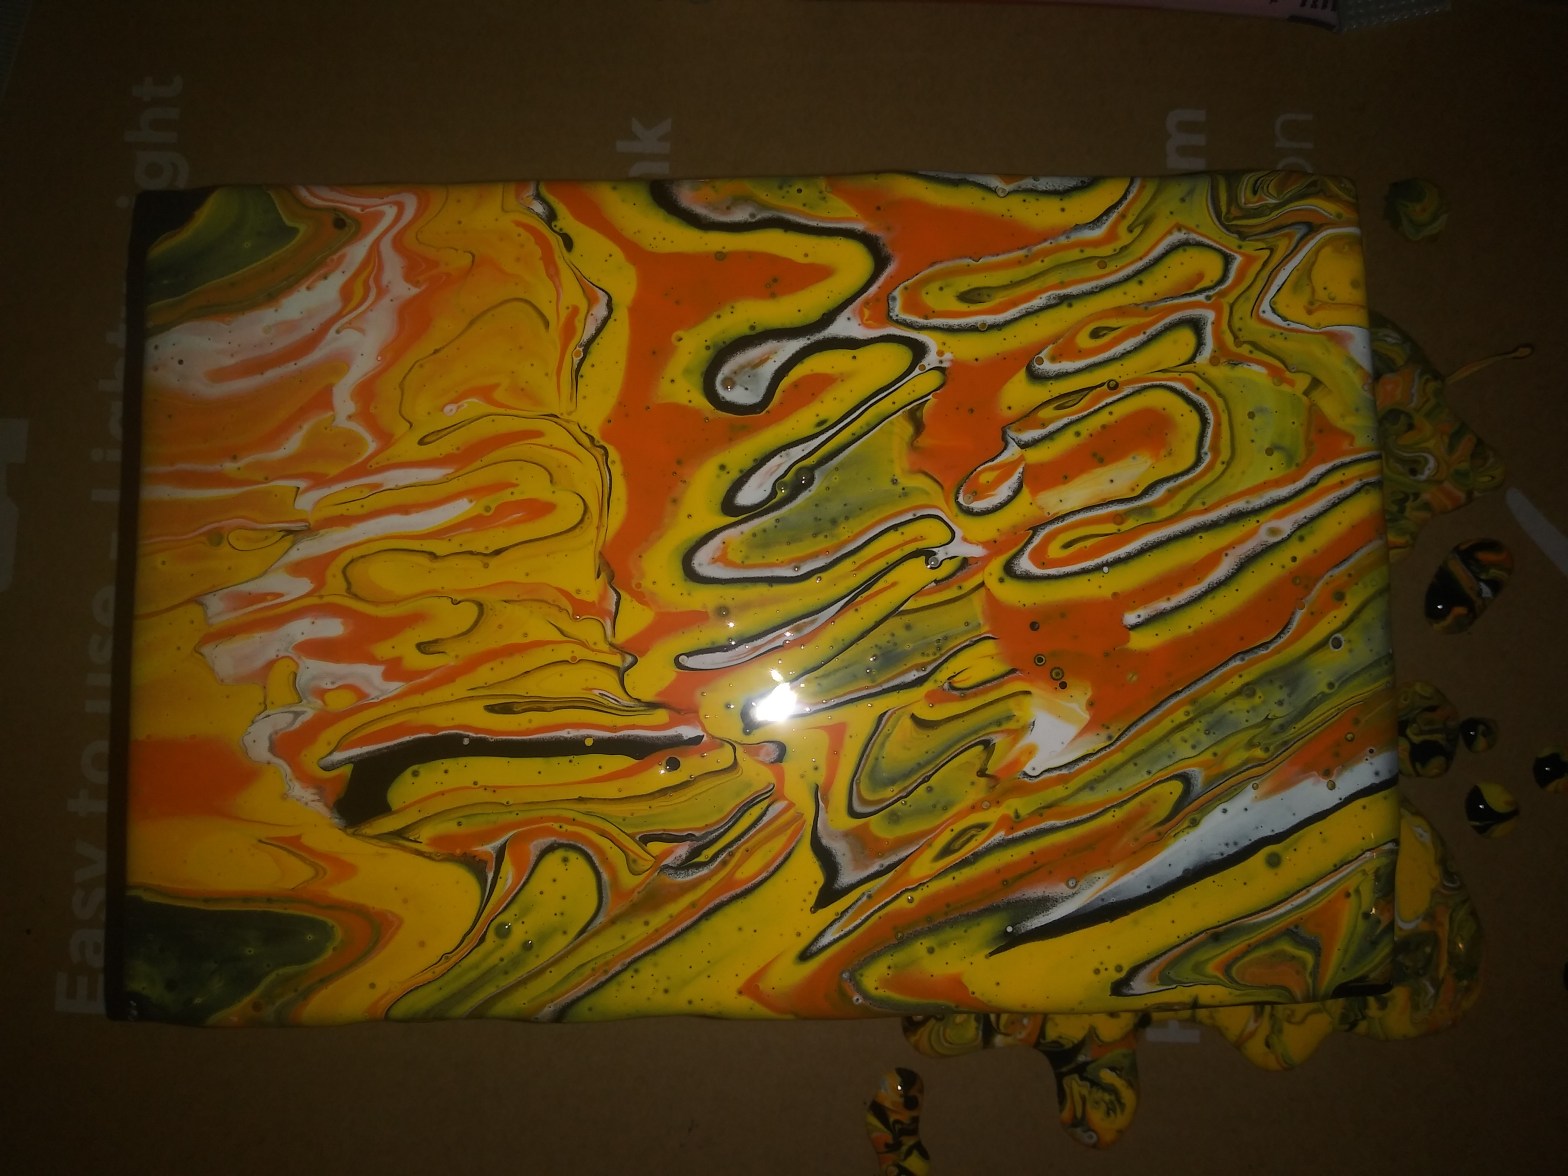
Acrylic Pouring is a fluid painting technique. It is based on acrylic paint, which can be brought into a liquid, pour-able consistency with the addition of pouring medium and other additives as required. Depending on the technique, this liquefied paint is then poured into each other or tilted onto the canvas and distributed by tilting the painting surface. Depending on the choice of the color, the medium and the additives, different effects are created.
Acrylic Pouring is Simple
Comfortable for beginners: For the acrylic flow technique you do not need any previous drawing or painting skills. From small to large everyone can enjoy this hobby.
Little material needed: You only need a small amount of supplies to start pouring acrylic.
Also for busy people: You dont have to invest half a day for an acrylic pouring artwork, but you can make a complete picture in a half an hour.
High fun factor: It is amazing to watch all the colors flow together and make different designs and you create a small piece of art without effort!
How does Acrylic Pouring Work?
The main things for Acrylic Pouring, besides the acrylic paint and pouring medium is a painting ground. Depending on how you want your art to turn out, you can add other things like silicone oil for cell formation or us a few auxiliaries and tools.
The acrylic paint is mixed with the pouring medium and other additives if you wish. The consistency must flow well but not too thin. The color mixture is then poured onto the painting base, tilted or emptied. This all depends on your technique and your own taste.
The pouring medium is an important factor
In acrylic painting, you use water to dilute your acrylic paints. It works well but is not recommended for acrylic pouring. Water not only changes the consistency, but also the pigment density and the adhesion of the paint to the painting surface. Your colors may dull after drying and cracks can appear on the paint surface due to the rapid evaporation of the water. That is why we use a pouring medium instead of water.
Examples are Liquitex Pouring Medium, Decoart Pouring Medium, Sargent Art Pouring Medium Acrylic. Alternative pouring mediums are floetrol paint conditioner or Elmers Glue-All Extra Strong. I personally have used glue from the dollar store and as you see in my paint pour, everything turned out just fine, I did use a tiny bit of water to thin it out a little more.
Recipes for a successful mixture
Floetrol
1 part acrylic paint, 1.5 parts of painting medium, 0.5 part of distilled water
Liquitex painting medium
1 part acrylic paint, 1.5 parts of painting medium, 0.5 part of distilled water
Vinyl glue
1 part acrylic paint, 1.5 parts of painting medium and 1 part distilled water
You should always first mix the acrylic paint with the pouring medium and then add water and silicone oil.
Creating Big Beautiful Cells
When it comes to making Cells in your painting if you want larger but fewer cells then you want a silicone oil with low viscosity. The lower the viscosity, the larger the cells. The paint flows faster and there are stronger color gradients. If you use silicone oil with high viscosity then the cells are smaller but there are more, the color flow is slower and there are more clearly defined and more color separation.
In my painting I went simple and cheap. Dollar store has a lot of the items, especially if you want to just test this out before getting the more expensive art supplies.
I used everything from the Dollar Tree:
Glue
Yellow, Black, White, Orange, Red Acrylic Paints
Water from my sink (worked fine)
Popsicle sticks to stir
Plastic shot glasses
Plastic clear cup
First you want to mix your paints. I would use a larger amount of paint for the priming of the canvas, and smaller amounts for the actual pour.
I primed my canvas with black paint, mixed with the glue and a tiny bit of water, make sure you mix the paint and glue really good before adding water. Make sure when you do this to only add extremely small amounts of water at a time, mix and then add more if needed to get the right consistancy. I stirred with my popsicle stick and lifted it out of the container to see how well it flowed off the stick. Do this for all the paints.
Once the canvas as been primed with your choice of paint, I take a clear cup and tilt it to the side. I pour a little out of each, always trying to keep it in the same area of painting. For example, I have one cup of each paint, I poured in a little white, a little red, a little orange, a little yellow, and a little black, then i start over and go back to white, and repeat until all the paint has been pour in or your cup is full.
Now there are 2 ways to use the cup method. I just poured right from the cup onto the canvcas. However you can put the canvas on top of the paint pour cup and then flip it over, and slowly move it around and lift when you can’t see anymore paint coming out.
After putting the paint on your canvas, let it sit for about 30-45 seconds and start moving it. If you like the pattern you have, you can add more of the paint primer you used to the canvas in the beginning, to stop the paint from spreading out too much. I circled the pour I did with black, and tilted the paint until the whole canvas was covered. You can get the paint to spread to the corners by using your finger to just dab where the pour is, and where the primer paint is.
Once this is completely covered and just how you want it, all you have to do is let it dry. You can use a clear paint, or varnish to make it super shiny, but this is not necessary, especially for practice purposes.
I hope you all enjoy a relaxing time with this paint pour method that relaxes me and I hope you too!
-Creation Meditation
