Acrylic Pouring is a fluid painting technique. It is based on acrylic paint, which can be brought into a liquid, pour-able consistency with the addition of pouring medium and other additives as required. Depending on the technique, this liquefied paint is then poured into each other or tilted onto the canvas and distributed by tilting the painting surface. Depending on the choice of the color, the medium and the additives, different effects are created.
Acrylic Pouring is Simple
Comfortable for beginners: For the acrylic flow technique you do not need any previous drawing or painting skills. From small to large everyone can enjoy this hobby.
Little material needed: You only need a small amount of supplies to start pouring acrylic.
Also for busy people: You dont have to invest half a day for an acrylic pouring artwork, but you can make a complete picture in a half an hour.
High fun factor: It is amazing to watch all the colors flow together and make different designs and you create a small piece of art without effort!
How does Acrylic Pouring Work?
The main things for Acrylic Pouring, besides the acrylic paint and pouring medium is a painting ground. Depending on how you want your art to turn out, you can add other things like silicone oil for cell formation or us a few auxiliaries and tools.
The acrylic paint is mixed with the pouring medium and other additives if you wish. The consistency must flow well but not too thin. The color mixture is then poured onto the painting base, tilted or emptied. This all depends on your technique and your own taste.
The pouring medium is an important factor
In acrylic painting, you use water to dilute your acrylic paints. It works well but is not recommended for acrylic pouring. Water not only changes the consistency, but also the pigment density and the adhesion of the paint to the painting surface. Your colors may dull after drying and cracks can appear on the paint surface due to the rapid evaporation of the water. That is why we use a pouring medium instead of water.
Examples are Liquitex Pouring Medium, Decoart Pouring Medium, Sargent Art Pouring Medium Acrylic. Alternative pouring mediums are floetrol paint conditioner or Elmers Glue-All Extra Strong. I personally have used glue from the dollar store and as you see in my paint pour, everything turned out just fine, I did use a tiny bit of water to thin it out a little more.
Recipes for a successful mixture
Floetrol
1 part acrylic paint, 1.5 parts of painting medium, 0.5 part of distilled water
Liquitex painting medium
1 part acrylic paint, 1.5 parts of painting medium, 0.5 part of distilled water
Vinyl glue
1 part acrylic paint, 1.5 parts of painting medium and 1 part distilled water
You should always first mix the acrylic paint with the pouring medium and then add water and silicone oil.
Creating Big Beautiful Cells
When it comes to making Cells in your painting if you want larger but fewer cells then you want a silicone oil with low viscosity. The lower the viscosity, the larger the cells. The paint flows faster and there are stronger color gradients. If you use silicone oil with high viscosity then the cells are smaller but there are more, the color flow is slower and there are more clearly defined and more color separation.
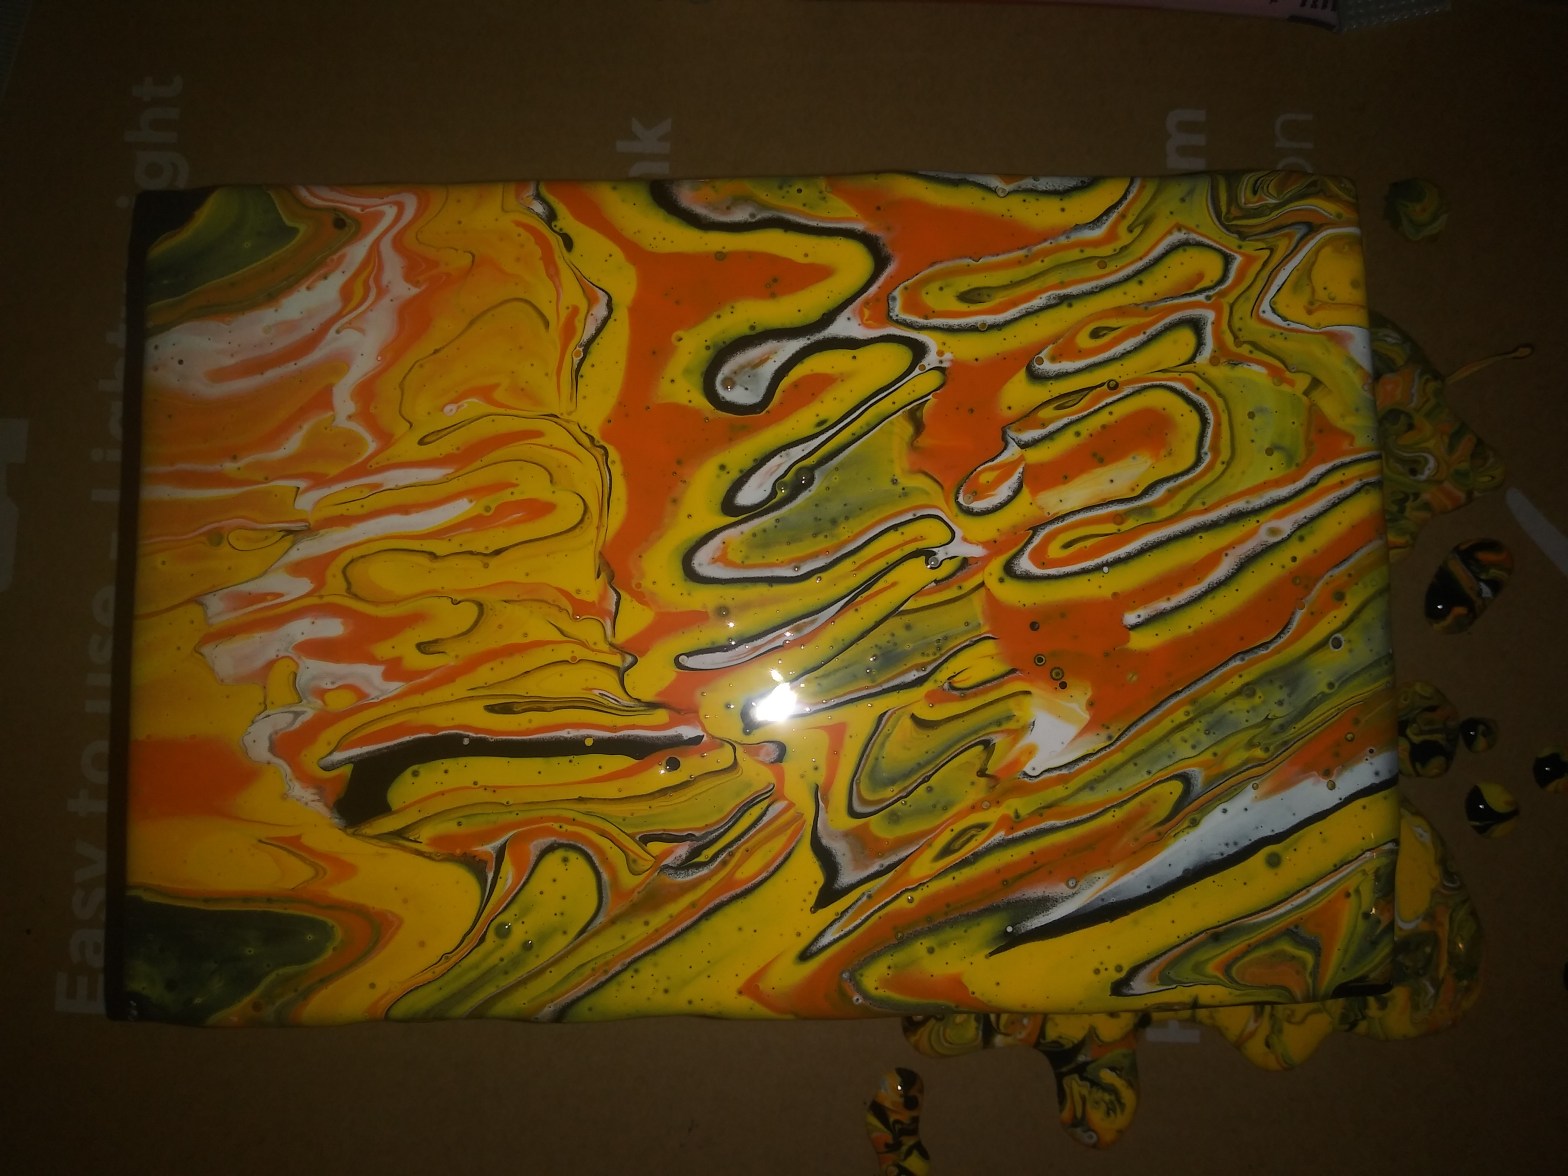
In my painting I went simple and cheap. Dollar store has a lot of the items, especially if you want to just test this out before getting the more expensive art supplies.
I used everything from the Dollar Tree:
Glue
Yellow, Black, White, Orange, Red Acrylic Paints
Water from my sink (worked fine)
Popsicle sticks to stir
Plastic shot glasses
Plastic clear cup
First you want to mix your paints. I would use a larger amount of paint for the priming of the canvas, and smaller amounts for the actual pour.
I primed my canvas with black paint, mixed with the glue and a tiny bit of water, make sure you mix the paint and glue really good before adding water. Make sure when you do this to only add extremely small amounts of water at a time, mix and then add more if needed to get the right consistancy. I stirred with my popsicle stick and lifted it out of the container to see how well it flowed off the stick. Do this for all the paints.
Once the canvas as been primed with your choice of paint, I take a clear cup and tilt it to the side. I pour a little out of each, always trying to keep it in the same area of painting. For example, I have one cup of each paint, I poured in a little white, a little red, a little orange, a little yellow, and a little black, then i start over and go back to white, and repeat until all the paint has been pour in or your cup is full.
Now there are 2 ways to use the cup method. I just poured right from the cup onto the canvcas. However you can put the canvas on top of the paint pour cup and then flip it over, and slowly move it around and lift when you can’t see anymore paint coming out.
After putting the paint on your canvas, let it sit for about 30-45 seconds and start moving it. If you like the pattern you have, you can add more of the paint primer you used to the canvas in the beginning, to stop the paint from spreading out too much. I circled the pour I did with black, and tilted the paint until the whole canvas was covered. You can get the paint to spread to the corners by using your finger to just dab where the pour is, and where the primer paint is.
Once this is completely covered and just how you want it, all you have to do is let it dry. You can use a clear paint, or varnish to make it super shiny, but this is not necessary, especially for practice purposes.
I hope you all enjoy a relaxing time with this paint pour method that relaxes me and I hope you too!
-Creation Meditation
